Toyota Sequoia 2008 - 2017 Spare Tire Removal and Re-Attach
How to find the tools and use them to remove a Toyota Sequoia tire
Contents
Introduction
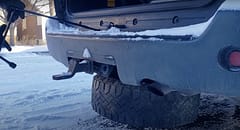
Quick video and explaination on how to find the tools and remove a Toyota Sequoia spare tire! The vehicle shown is a 2nd Gen 2013 Toyota Sequoia Limited, the location for tools and process should be the same or very similar for 2008 - 2017 models.

Video on How to Remove Spare Tire and Re-attach
Written Instructions to Remove Spare Tire
The tire jack and spare tire tools are in the trunk floor compartment. Open the compartment and along the back side is a panel you pop off. Find tools in there.
Remove the little plastic cap next to where the back door attaches to the base of the trunk.
Insert the long hook tool into the hole and wiggle it around until you feel it click into place. Attach the crow bar tool to the end of the pole you are working with to make it easy to turn. If you can’t get it to click check out the video it shows what the actual mechanism looks like.
Turn left to lower the tire all the way to the ground.
Once on the ground remove the section holding the tire up by tilting it and pulling it out.
Your tire is now free.
Turn the tool right to raise a tire (after you re-insert the metal holder attached to chain) or only raise the chain.
Put your tools back in the proper place so you don’t loose them.
Note this should work for a Toyota Sequoia 2008, 2009, 2010, 2011, 2012, 2013, 2014, 2015, 2016, 2017.


