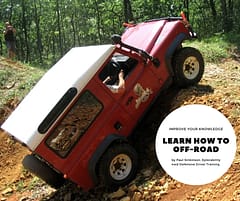
Land Rover Discovery 2 Automatic & Manual Guidelines
Learn How to Best Use ABS, TC and HDC
Contents
- Anti-Lock Braking System (ABS) - Traction Control (TC) - Hill Descent Control (HDC)
Anti-Lock Braking System (ABS) - Traction Control (TC) - Hill Descent Control (HDC)
The Land Rover Discovery 2 comes with ANTI-LOCK BRAKING SYSTEM (ABS), TRACTION CONTROL (TC) and HILL DESCENT CONTROL (HDC) as Standard.
This content was developed by and owned by Paul Sinkinson, Xplorability owner. Paul is a 4wd Defensive Driver Training Consultant/Trainer and Programme Developer.
Some EARLY Discovery 2 Models came with the CENTRAL DIFFERENTIAL LOCK (CDL) fitted as standard but there was a period when firstly although the inner workings for the Transfer Box CDL were installed, Land Rover for reasons unknown to me and others, did not install the Lever Mechanism to operate the CDL.
Eventually, for a period they also removed the inner mechanism.
Later, they added the CDL again or it was available as an extra.
The CDL internal mechanism/transfer case and also the necessary operating levers etc. can be Retro-Fitted if required by specialist companies or they can be supplied as a kit for self installation. Check out ASHCROFT TRANSMISSIONS in the UK.
For Land Rover Discovery 2 Owners this should be read in conjunction with the Xplorability document on Crossing Ditches with Traction Control Central Differential Lock and use of rear air suspension if fitted. Information coming shortly!
Anti-Lock Braking System (ABS)
The Discovery 2 ABS or any ABS System doesn’t mean that the vehicle will brake any better. WOW! That’s a statement you didn’t expect to read, I’m sure.
What is ABS?
ABS is an Anti-Lock System that is designed to detect the wheels independently should they lock up under excessive braking. When a wheel locks up, the system releases it with a pulsing braking system that allows the wheel to unlock and lock and unlock and lock many times a second and that both stops the vehicle sliding over the road surface while at the same time allowing steering input so the driver can avoid obstacles. Without that, although the driver may be able to turn the steering wheel, the vehicle would just continue to slide straight on and a collision may be unavoidable.
The System requirement for the ABS to operate is for the Driver to be braking. (Usually heavily).
The Discovery 2 uses the ABS System to provide Traction Control (TC) and also Hill Descent. Control (HDC) – Clever stuff that no doubt some clever technical electronics bod could go into greater detail on.
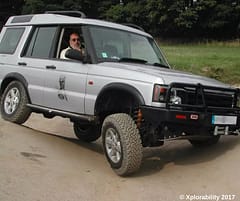
Discovery 2 being driven by a colleague on hand controls
Traction Control (TC)
How does TC work?
Traction Control works in conjunction with the ABS System in both High and Low Range and it works independently on each wheel as required.
However, it ONLY works if the system recognises that the driver needs it and it does this ONLY if the driver has his/her foot on the Accelerator/Gas Pedal. (In simple terms it says HEY! They need something and they haven’t got a foot on the Brake but they have a foot on the Gas pedal so they cant be wanting ABS or HDC so it MUST be TC they’re after.)
If a wheel now slips, the power will move through the transmission system and the differentials within that and the wheel will now receive all the power which in turn takes that same power from the other wheels.
When the slipping wheel rotates sufficiently for the TC System to recognise this the System applies the Brake on that wheel pulsing the brake on and off slowing it down until all the wheels are receiving the same amount of power. When this happens, traction on all the wheels is now regained.
BUT a Wheel has to slip and loose Traction before it is recognised and this can happen.
To understand what is happening you need to know that the Discovery 2 has THREE Differentials. One in the Front Axle, One in the Rear Axle and then a Centre One that is between the front and the rear axles. Because in Permanent 4 Wheel Drive IF a Wheel looses traction the power is transmitted through those three differentials to the wheel that is slipping as that is the one offering least resistance. (OK SO THAT BIT WAS TECHNICAL)
So we have for instance, FOUR Wheels – We have 100% of Transmission Power with 25% of it going to Each Wheel - 25%+25% on the Front Axle and 25%+25% on the Rear Axle. Because the Central Differential is what they call running OPEN, if a Wheel slips then a % of the power from each of the other wheels goes to that slipping wheel and in fact eventually it would receive the FULL 100% which means the other THREE Wheels Stop. IF you slow down that Spinning wheel back to it’s 25% then the other 75% is distributed back 25% to each remaining wheel and traction is regained. PHEW What a mouthful.
I hope you now understand that IF the Slipping Wheel is braked sufficiently then power becomes evenly distributed to each of the wheels and you regain traction.
That’s how TC works when you have the OPEN Centre Differential.
What happens if I have CDL?
IF YOUR Discovery 2 is fitted with a CENTRAL DIFFERENTIAL LOCK (CDL) then the system works slightly differently IF the CDL is Engaged which involves a simple movement of the Lever Sideways to the LEFT of the Vehicle Centre.
NOW, IF there is Slippage on a Wheel, because the CDL is engaged, that Slippage only affects the other wheel on the Same Axle. Because the CDL is locked, the other Axle will not be affected and so although the Slipping wheel will receive the other 25% of Power from it’s opposing Wheel on the same axle it will only increase to now have 50% of the Power. The other 50% will be still available 25% to each of the wheels on the other Axle which will still have traction and drive the Vehicle forwards or backwards whichever way you were moving.
So I hear you ask. What happens IF the CDL is engaged and NOW we get a Wheel on EACH Axle Spinning?
WELL FOLKS Initially you are STUCK in what is termed as a CROSS AXLE Situation. (This has nothing to do with the Vehicle’s temper).
With the CDL engaged, if a wheel looses traction on one or each axle then that wheel will take all the power away from the other wheel on the same axle. If it happens on BOTH Axles then each slipping wheel will be receiving 50% of the power and its opposite number will be stationary.
NOW, IF you increase the throttle setting with the accelerator/gas pedal, the TC System recognises the fact that you are requiring it’s services and as you increase the power it will in turn apply the brakes to the two spinning wheels, ONE on EACH Axle. When the system slows those spinning wheels down to their 25% the other 25% of the power will move back across the transmission via the Axle Differentials to the opposing wheel and you NOW have 25% power again on each and you regain the Traction on all four wheels and the vehicle will move.
The MISTAKE that drivers make is not to continue increasing the power gently and sufficiently until you have that required result and regain the traction. What happens is that they feel some movement of the vehicle, they hear the brakes being applied (which sometimes sounds dramatic with the TC “Burping” away) so they back off the power and the vehicle stops again.
You DO NEED TO PRACTISE this until it comes naturally and onlookers will be most impressed.
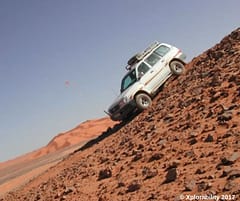
You can benefit from your TC system for all ascents and or normal mixed terrain conditions whether or not you have the Central Differential Lock facility on your Discovery 2.
If you do have the CDL installed then it is usually wise to engage it well before it may be needed as long as the terrain allows for some wheel slippage (IE NOT Solid Tarmac or Similar).
By using the CDL it will limit the slippage and loss of traction as described earlier and the unaffected axle will either push or drag you through an obstacle with less stress on the transmission components.
Once a Wheel leaves the terrain and loses traction without CDL Engaged usually 100% of power is transmitted to it. Traction Control (TC) Brakes the spinning wheel and redistributes power back to the other wheels – regaining traction. If Centre Diff-Lock is fitted and Engaged and a wheel loses traction, only the opposing wheel on the same axle will stop. The other wheels will usually push or pull you through an obstacle.
Hill Descent Control (HDC)
Again, often better to engage the system once you are in Low Range on varied terrain.
HOWEVER – REMEMBER – HDC does NOT WORK on short sharp steep descents as you will not have built up sufficient speed for the system recognise it is required even with your feet off the pedals.
SO, WHAT CAN YOU DO on Short Steep Descent?
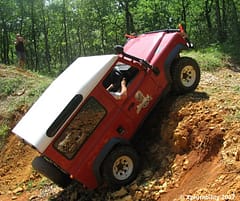
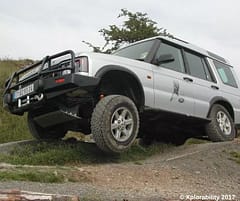
Discovery 2 AUTOMATIC VEHICLE - Short Steep Hill Descent on Rock without the HDC
THIS TAKES PRACTICE – FIRST TRY THE SYSTEM ON LEVEL GROUND AND WORK UP TO A TRYING IT ON A SLOPE
Engage LOW RANGE FIRST GEAR – IF YOU HAVE CDL ENGAGE THAT AS WELL.
Using your LEFT Foot on the BRAKE Pedal, apply the Brake.
Now GENTLY Apply Throttle until you feel the vehicle trying to move against the Braking Resistance. Once you feel this then maintain a constant throttle while you release the brake fractionally. The Vehicle will now move slowly. If you want to stop, apply more brake pressure. If you want to move release some pressure. You now have control actually using the the Brake this time as the system of Stop or Go. So, as you descend a short rocky, firm or undulating surface you are able to manage it. SLOW IS GOOD!
By using this system, with the brake being applied, you also limit suspension movement and this stops the vehicle shock absorbers bouncing on the terrain.
As I said, it takes Practice.
Discovery 2 MANUAL VEHICLES - Short or Steep Rock or Hard Terrain Descents or Ascents
For Descents LOW Range First gear with CDL Locked if fitted.
Just like the previous information for the Automatic Discovery in a somewhat similar manner BUT instead of Throttle and Brake balance you can use the Brake and Clutch Balance for slow positive control on such descents.
Put the footbrake on firmly. Engage 1st Gear Low Range with CDL Locked if fitted BUT NOW, use the balance between releasing the clutch so that it engages the transmission while you release the brake pressure to allow forward movement. As with the Automatic, because you have the brake pressure applied the suspension travel will be limited so that it will not “Bounce” as much as usual over the terrain.
You can use exactly the same system for such an Ascent under Slow Control when “Momentum” is not required. Normally, with the Manual Gearbox, you may not need to do this as the engine torque is sufficient to slowly take you over such terrain. However, try this and practice it in case you ever need it.
Discovery 2 HILL DESCENT CONTROL (HDC)
So that leaves us with HDC - What does that do?
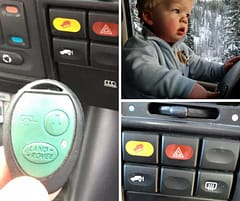
Up on the facia panel to the left of the steering wheel are “Buttons” for you to play with. The Yellow one with the picture of a vehicle descending is the one you’re after. That’s the HDC Button. Press it in when you are in High Range and ALL you get is modern Jazz as it goes Bong, Bong etc. That’s to remind you that it ONLY works on the Discovery 2 when you’re in LOW RANGE. So, engage Low Range and you will see a Green Light on the Dash Panel with the image of a descending vehicle.
ALSO, it ONLY WORKS if you haven’t got your feet on any of the other pedals. IE If you have your foot on the brake the ABS system will think it is required and likewise if you have your foot on the throttle and not the brake the system may think you need TC. So once you are descending a hill take your feet off the pedals and just rest them flat on the floor to avoid the temptation as if you touch any pedals then the system will cut off and you go down steep hills with that “Tally Ho” feeling of uncertainty. When that happens, you may then hit the brakes, skid, turn sideways on a slope and the next thing you know you are upside down. BE WARNED – Keep your feet off the pedals and TRUST THE HDC SYSTEM. It’s always a good thing if the track allows, to speed up a few yards from the crest of a descent and then back off as it will wake up the HDC System and it may operate that bit earlier as you go over the edge.
What does it do? Well, IF you are descending a slope in low range with the HDC button pressed in, once you have achieved a descent speed usually in excess of 6 or 8 mph the HDC will cut in independently on each wheel and control the wheel speed limiting it usually to 4 or 5 mph so you have a controlled descent when you back off the power.
Excessive overuse for LONG periods on steep descents may of course cause brake fade and when this happens the indicator light on the dash panel will turn Yellow – So, turn it off and let it cool down until it goes green again.
Previous Article: Ascending Hills and Slopes
Next Article: Descending Hills and Slopes
Check out other work by Paul, fiction thriller novels here.
Copyright
This content was prepared for the Off-Road Discovery Website by Xplorability 4wd Training
The Content - All Photographs and Photographic Copyright and All other Rights other Reserved October 2017. S.W. France This content may not be copied or reproduced without the written consent of Paul Sinkinson – Xplorability Training.
For Use Only in 4wd and Light Vehicle Driver Training.
Not for Re-Publication, Distribution or use outside the Xplorability Training Programme
You may also like …